Thursday, September 16, 2010

My New Love......Paula Deen's Ooey Gooey Butter Cake


While I was shopping at Walmart one day, I came across the yummiest lemon cake in the bakery.  After trying this delicacy, I decided that I should find a recipe for it.  After all, I couldn't keep spending $3.00 for a little slice of cake.  The package said that it was Paula Deen's Ooey Gooey Lemon Butter Cake.  Surely I could find a Paula Deen recipe online.

And I did!  I really love Google.  With the click of my mouse, I was able to find a ton of sites with this recipe.  And what's even better........The recipe comes with many variations.  I plan on trying the pumpkin variation next. It sounds perfect for fall.  Today I made the Lemon Butter Cake, because that is what I was craving.

Paula Deen's Ooey Gooey Butter Cake
Cake
1 (18.25 ounce) box yellow cake mix
1 egg
1/2 cup (1 stick) butter, melted

Filling
1 (8 ounce) package cream cheese, softened
2 eggs
1 teaspoon pure vanilla extract
1 (16 ounce) box confectioners' sugar
1/2 cup (1 stick) butter, melted

Preheat oven to 350 degrees.  Lightly grease a 13x9x2 inch baking pan.

In the bowl of an electric mixer, combine cake mix, egg, and butter and mix well.  Pat into the bottom of   prepared pan and set aside.

Still using an electric mixer, beat cream cheese until smooth; add eggs and vanilla.  Dump in confectioners' sugar and beat well.  Reduce speed of mixer and slowly pour in butter.  Mix well.

Pour filling onto cake mixture and spread evenly.  Bake for 40 - 50 minutes.  Don't be afraid to make a judgment call on the cooking time, because oven temperatures can vary.  You want the center to be a little gooey, so don't bake it past that point!

Remove from oven and allow to cool completely.  Cut into squares.  Just remember that these wonderful little cakes are very, very rich, and a little will go a long way.

Here are the different variations.....you can have fun and even create your very own version of this delicious dessert.


Pumpkin Gooey: Follow the original recipe, adding a 15-ounce can of pumpkin pie filling and an extra egg to the cream cheese filling. Bake as usual, remove from oven, and allow to cool. Cut into squares and top each square with a pecan half. Serve with a dollop of fresh whipped cream. I promise you'll never want pumpkin pie again!

Pineapple Gooey: Add a 20-ounce can of drained crushed pineapple and an extra egg to the cream cheese filling. Proceed as directed above.

Lemon Gooey: Use a lemon cake mix in place of the yellow cake. Add the juice (approximately 1/4 cup) and zest of 2 lemons to the cream cheese filling. Proceed: as directed above.

Carrot Cake Gooey: Use a spice cake mix, and add 1 cup chopped nuts and 1 1/2 cup finely grated carrots to the cream cheese filling. Proceed as directed above.

Peanut Butter Gooey: Use a chocolate cake mix. Add 1 cup creamy peanut butter and an extra egg to cream cheese filling. You can sprinkle the top of batter with 1 cup chopped peanuts if you like. Proceed as directed above.

Chocolate Chip Gooey: Use either yellow or chocolate cake mix. Sprinkle 1 cup chocolate chips and 1 cup chopped nuts on top of filling. Proceed as directed above.

Banana Gooey: Use a yellow cake mix. Prepare cream cheese filling as directed, beating in 2 ripe bananas and an extra egg. Proceed as directed above.

Nutty Gooey: Use a yellow cake mix, and add 1 cup chopped nuts to the cake mixture. Proceed as directed above.

Chippy Gooey: Stir 1 cup white chocolate chips, peanut butter chocolate chips, butterscotch morsels, Heath Almond Toffee Bits or Heath Milk Chocolate Toffee Bits into filling. Proceed as directed above.


Give this treat a try, and let me know what you think.  Also let me know if you have any other variations that I can add to my list!  These bar-like treats will not disappoint.

Monday, August 9, 2010

Darin and Kari's Wedding Cake

I vowed that I would never make any cakes 9 months pregnant.  But when my brother asked me to make his wedding cake, I was happy to do it.  Luckily, I have a loving husband who helps me when I need it.  He actually did most of the work on this cake, and it turned out great!

Two of the cakes are chocolate with a chocolate butter cream filling, and the other two are a white cake with butter cream filling.  As we were getting ready to stack the cake, my 3-year old came up to my husband with cake crumbs all over his face!  We soon realized that he had taken several handfuls of this cake and eaten them.  We were able to doctor it up and save the day.  It turned out great, and I am very thankful for my husband, Jim, for helping out so much with this cake.  And a BIG congratulations to Darin and Kari on their special day.  Thanks for letting us do your cake!  I think I will now retire from cakes until this baby is born.
This is Darin and Kari cutting their cake.  It wasn't long before they had it smashed in each other's faces.  They were sure silly!

Sunday, July 4, 2010

Chocolate Chip Cheese Bars.....A Guest Post From Jill.

My dear Sister-in-Law posted this recipe, and I thought that all of you would enjoy it.  These Chocolate Chip Cheese Bars are to die for!  Here is a copy of her post.......


First of all, I don't usually post recipes because I am the worst at following them.  I get it from my mom- she calls it the "Football Rules of cooking- unlimited substitutions."  My mom probably gets it from her mom.  I have recipes from my grandma that actually call for a glug of milk, or a glug of oil.  I look at recipes more as suggestions or guidelines, then do my own thing.  Sometimes things turn out really good, and sometimes... not so good.  My husband likes the way I cook, so I guess that's good enough.  I discovered allrecipes.com and found that there are a lot of cooks out there like me.  It makes me laugh when I read the comments, and someone says they didn't like the recipe that much, and that they substituted rice vinegar for apple cider vinegar and left out the ginger or doubled all the spices...  BTW, I do follow baking and canning recipes.


Anyway, my sister-in-law made these yummy bars earlier this year, and passed the recipe along. 


Chocolate Chip Cheese Bars


2 cups of your favorite chocolate chip cookie recipe (or 1 tube refrigerated chocolate chip cookie dough)
1 package (8 oz.) cream cheese, softened
1/2 cup sugar
1 egg


Divide cookie dough in half.  For crust, press half of the dough onto the bottom of a greased 8 X 8 inch baking pan.
In a large bowl, beat the cream cheese, sugar and egg until smooth.  Spread over crust.
Crumble remaining dough over top.
Bake at 350 for 35-40 minutes, or until a toothpick inserted near the center comes out clean.  Cool on a wire rack.  Refrigerate leftovers.


I doubled the recipe, and cooked it in a 9 X 13 pan.  


Here's the recipe I like for Chocolate Chip Cookies:

1 c white sugar
1 c brown sugar
1 c butter flavored shortening (or 1/2 c shortening and 1/2 c butter)
3 eggs
1 t vanilla
1 t salt
1 t soda
3 cups flour
1 bag chocolate chips

Cream together sugars, and shortening.  Add eggs and vanilla and mix well.  Add dry ingredients then chocolate chips.  Bake at 375 for 8 minutes.


Thank you so much Jill for this yummy post!

Saturday, June 12, 2010

Old McDonald Had A Farm Cake

FONDANT PIGS......


FONDANT CHICKEN......


FONDANT BABY CHICKS......
(I know, they kind of look like ducks!)


FONDANT COWS......


FONDANT HORSES....  AND A SHEEP!


This is the cake that I've been working on.


Cute, isn't it?


This cake was made for Ryan's 2nd grade teacher, Mrs. Inderrieden, who we absolutely adore.  She had a family reunion this week for the McDonald Family.  The theme of the reunion was "Old McDonald Had a Farm".  What a cute idea, huh!  Well, this cake was a lot of fun to make, and it was made by my whole family.  The kids got involved making fondant animals.  Erin made the chicken and baby chicks, which turned out great.  Jim made the cows and the horses, and I made the pigs and the sheep. Adam helped by eating some of the fondant.  If you look closely in one of the pictures, you'll see an over-sized rooster that Ryan made.  We only put it on for pictures.

The sheet cake and the barn were both carrot cake, with a cream cheese filling.  We made the silo with Rice Krispie treats.  I made the fence posts out of modeling chocolate, but realized afterward that I should have just used big Tootsie Rolls.  Oh well, they turned out really cute.

We were really proud of this cake when it was done.  The kids begged me to wake them up early so that they could see their creation one last time before it went out the door.  Thanks to Mrs. Inderrieden, for giving my family something fun to do this week.  This cake was a lot of fun!

Sunday, June 6, 2010

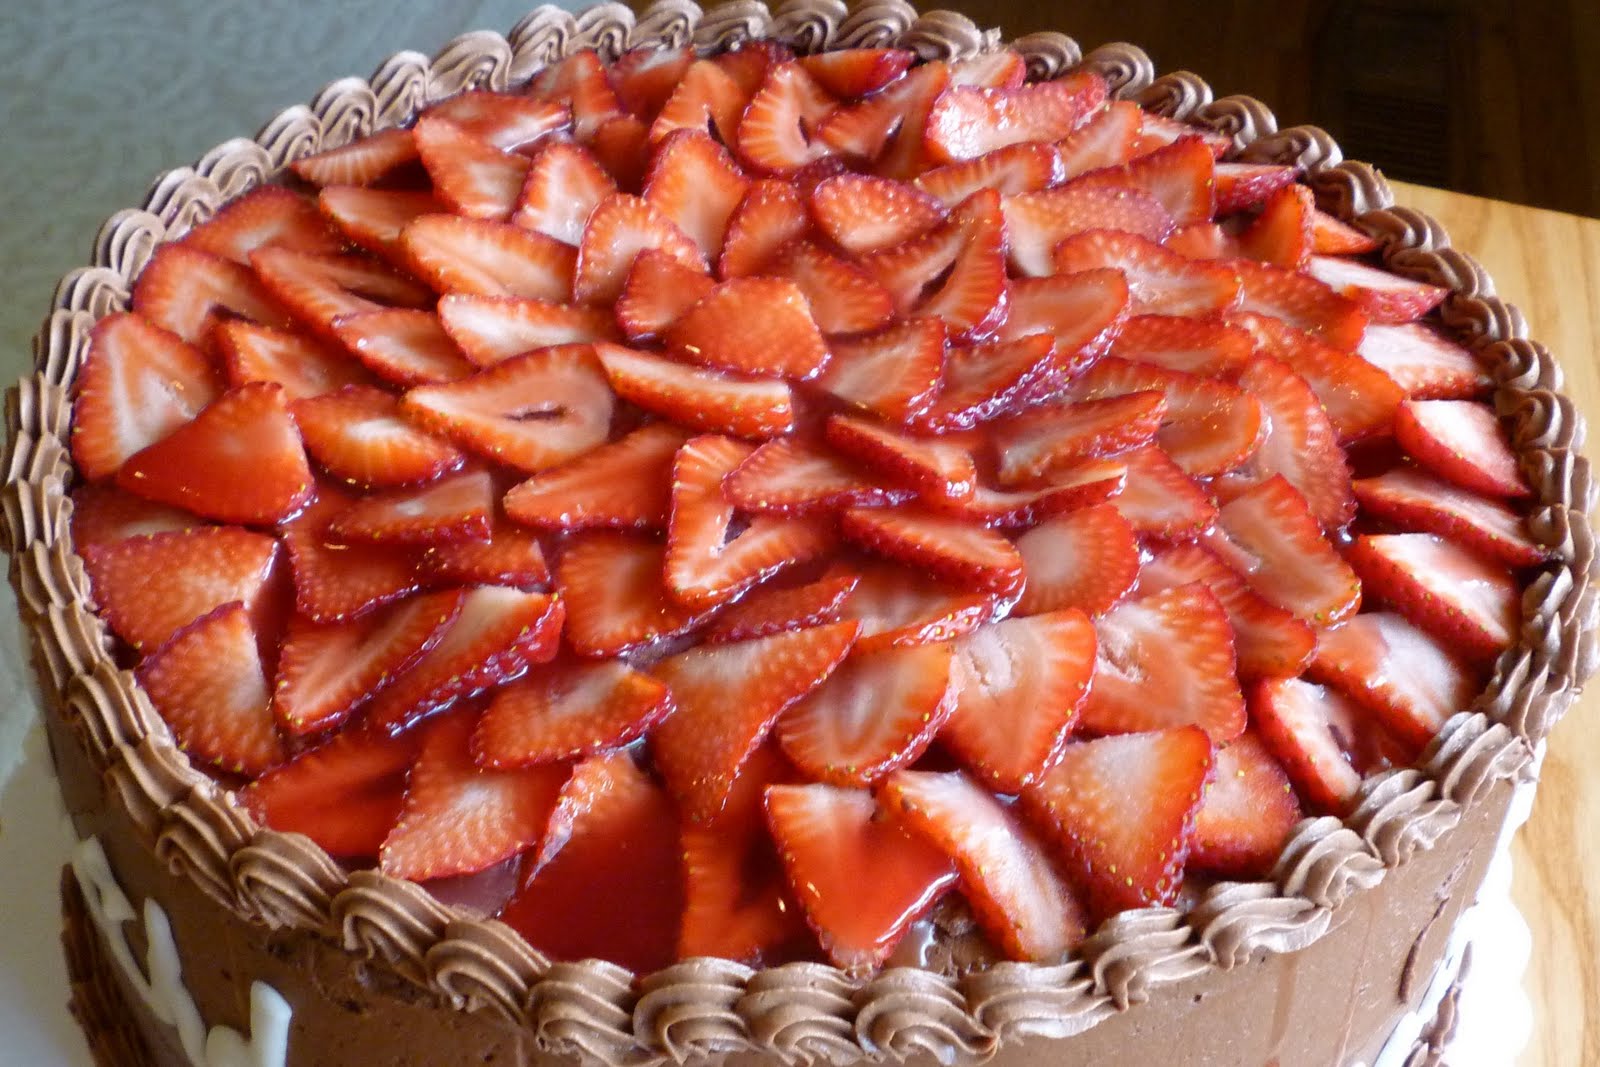
A Decadent Chocolate Strawberry Cake For Berneitta!


Last night I had the opportunity to make a cake for some good friends of mine.  They were celebrating their Grandmother's birthday.  When I asked what flavor of cake they wanted, the response that I got was, "Whatever you think would be good".   Hmmmm......Well, I think almost all cakes are good.  I decided that I could NEVER go wrong with chocolate.  And who doesn't like strawberries?  That's when I decided to make this decadent Chocolate Strawberry Cake.  It is a moist 12 inch cake, stacked 3 layers high, and  it is filled with a rich chocolate butter cream frosting.  While I was frosting the cake, and washing and slicing the strawberries,  my cute husband was melting white chocolate to do the lettering on the sides.  We actually wrote the words out, and then formed them to the 12 inch pan so that they would bend with the cake.  I think they turned out great!  I also made a delicious strawberry glaze, which I drizzled on top of the strawberries.  I will have to share the recipe with you, because it really turned out great!  This glaze would also work as a filling for inside the cake.  


Strawberry Cake Filling/ Glaze

1 small box Strawberry flavored gelatin
1/2 cup hot water
1 (20 oz.) jar Strawberry jam  (I used the seedless kind)
1 cup water
1/2 cup cornstarch


Mix the gelatin with 1/2 cup hot water.  Stir until dissolved.  Add the jam.  Stir until well blended.  Combine cornstarch and 1 cup water.  Set aside.  Heat jam mixture to boiling.  Add cornstarch mixture.  Stir over heat until thickened.  Cool and use.

You can use any flavor of gelatin and jam.  (This is what I use for my raspberry cake filling, and it is great!)


This cake turned out great, and the family loved it!  I can't wait to make another one.

Tuesday, May 18, 2010

Easy To Make.....Chocolate No Bake Cookies!


This post was inspired by Tina at Mommy's Kitchen .  As I checked my Facebook today, she had a post that said she was making Chocolate No Bake Cookies.  Well, I LOVE no bake cookies, and so do all of my kids.  Although if I told them I was making no bake cookies, they wouldn't know what I was talking about.  They call these little delicacies  "Gorilla Poop Cookies".  I knew that I couldn't make just a single batch with the kids coming home from school soon.  My eight year old son can eat a dozen in seconds and top it off with a cold glass of milk.

Anyway, I looked over Tina's recipe.  It seems to be a little different than mine.  Her recipe calls for 3 Tablespoons of Cocoa Powder, and my recipe calls for 1/2 cup of Cocoa Powder.  I'll have to try them both ways.  But today, I used my own recipe.  I made my kids very happy.  Right when they walked in the door from school, they could smell the rich chocolate smell of "Gorilla Poop Cookies".  At least I was able to use the cookies as an incentive to get their jobs done quickly.

Chocolate No Bake Cookies

2 cups sugar
1/2 cup butter
1/2 cup milk
1/8 teaspoon salt
1/2 cup cocoa
1/2 cup peanut butter (crunchy or smooth)
1 teaspoon vanilla
3 cups oats, rolled or quick

In a saucepan, combine and heat sugar, butter, milk, salt, and cocoa.  Bring to a rolling boil.  Take off heat and stir in peanut butter, vanilla, and oats.  Line a cookie sheet with wax paper.  Place mixture by teaspoonful on to the wax paper.  Refrigerate until firm.


If you've never had No Bake cookies before, give this recipe a try.  It won't disappoint you!  And it is very easy to make!  I hope you enjoy!!!

Tuesday, May 11, 2010

Brad and Ashley's Wedding Cake

Here is the wedding cake that I've been working on the last couple of days.  It felt really good to be able to get back into the kitchen after being out of commission for a while.  This cake was made for my nephew, Brad, who married his sweetheart, Ashley, today.  The cake was 5 layers of chocolate cake filled with a chocolate buttercream filling.  It was topped with a home-made marshmallow fondant, and adorned with swirls, which I piped on with an eggplant colored buttercream. (Be sure to click on the picture to get a better view of it!)

This cake was a lot of fun to make!  A big THANK YOU and CONGRATULATIONS to Brad and Ashley on their special day.

Saturday, February 6, 2010

Ryan's Baptism Cake...Any Chocolate Lover's Dream


My little Ryan turned 8 this week, and it was a very special birthday for him. He got to be baptized. To celebrate the occasion, I made a chocolate lover's dream cake. Each layer was chocolate cake filled with chocolate fudge frosting and crushed Oreo cookies. The cake was adorned with Kit Kat candy bars around the edges, and M&Ms on top. It was delicious and it was a BIG hit with the kids. Everyone loved it! Happy Birthday Ryan, and congratulations on your Baptism. We Love You!

Tuesday, December 29, 2009

Meal or No Meal....

Many of you have seen or heard of the game show “Deal or No Deal”. Well, the other night, we attended a party where the theme was “Meal or No Meal”. Thanks to my creative sister-in-law and her family. Our game involved a contestant, a BAKER, and Howie Michael as the host.
Here is the famous baker!


Instead of having numbered briefcases to select, we had numbered pizza boxes. Inside each pizza box was a picture of a treat or goodie. The smallest prize was a single M&M, and the largest prize was a giant box of chocolates.


There were other prizes in between such as an oreo cookie, miniature candy bars, regular candy bars, and king size candy bars. Every so often, the BAKER would call on a cell phone to offer the contestant a goodie to quit the game. This offer was based roughly on the amounts of goodies remaining in play. At this point, the contestant would have to choose “Meal” (which would end the game), or “No Meal” (and they would have to choose another pizza box).


Yes, it really is a cake!

I thought it looked like a real briefcase. I guess I'm not the only one, because somebody tried to open it!

Thursday, December 17, 2009

One of my Passions Revealed

To all of my friends in cyber land. I am about to reveal one of my passions that I have this time of year. I have many of them, but this passion makes my mouth water and my taste buds dance. It is sweet and tasty. And people either love it or they hate it. It is something that I remember having every Christmas season since I was a small child. It is EGGNOG! I’ve been pretty good at avoiding it as I pass by the dairy section of the grocery store. But today I caved in and bought me some. Ok, to be honest, I bought a couple of cartons.

Now, I didn’t pour me a full glass and sit by the fire and enjoy a moment of heaven. Even though that sounds so nice. I made dinner and dessert with it. Oh, and it was good. Really, really good. My kids gobbled up every bite, and asked for seconds, and thirds, and fourths………ok, they just took seconds. But they liked it a lot. Dinner was Eggnog Pancakes! Have you ever heard of such a thing? Neither had I. But I made some and they were a sure hit. For some reason, eggnog pancakes and maple syrup go really well together. Here is the recipe for my Eggnog Pancakes. You should give them a try.

EGGNOG PANCAKES

1 1/4 cups all-purpose flour

1 egg

1 1/2 cups eggnog

1/4 cup granulated sugar

1 teaspoon baking powder

1 teaspoon baking soda

1/4 cup cooking oil

1 pinch salt

1/2 t. rum extract

1/2 t. nutmeg

Preheat a skillet over medium heat. Mix all of the ingredients until combined. Melt a little bit of butter in the pan. Pour the batter by spoonfuls into the hot pan, forming 5-inch circles. When the edges appear to harden, flip the pancakes over. They should be golden brown on both sides. Makes 8-10 pancakes. Enjoy!

For dessert I baked an Old Fashioned Eggnog Bundt Cake. It was very moist, delicious, and rich. I got this recipe from Tina over at Mommy’s Kitchen, who by the way, has an amazing site. But you’ve heard me say that before. She truly is the blogger of all things yummy. Here is a link to her site, so you can get the recipe. It was easy to make and took only a few ingredients. And, I got to use a bundt pan that I bought about 10 years ago that I have never used.

Here are the few ingredients. (Notice the big, beautiful, brown eggs. They came from my Rhode Island Red chicken. She just started laying about a month ago.)

I mixed them together.....
......and here is my first Bundt Cake.
An Eggnog Bundt Cake! And it was more delicious than I could ever describe. I will definitely be making this cake again. Especially now that I've conquered my fear of baking in a bundt pan. I hope you give this cake a try and enjoy it as much as I did.

Tuesday, December 15, 2009

Krystal's Package Wedding Cake

I am finally able to post pictures of the cake that we did last weekend. And I say "we", because my husband actually did most of the work on this one. I'm teaching him well. I really enjoy the time that I get to spend with him while decorating cakes. He is by my side through every cake that I make. I keep trying to get him to go into business with me, but he isn't as passionate about cake decorating as I am. Even though he is extremely talented at it.

I am really pleased with how this cake turned out. (BE SURE TO CLICK ON THE PICTURE TO GET A BETTER LOOK AT THE DETAILS) I had never made a big bow out of fondant before, and it really was the highlight of this cake. It took four days to make, and it was fun to take on the challenge. Here are some pictures of the progress of my bow.


How To Make A Fondant Bow

I started by rolling out the fondant to about 1/8 inch
thickness. Next I cut it into 1 inch strips.

I hung the strips over a wooden dowel, to shape them into a loop. I painted the ends with water and pinched them together.
Then I painted each loop with a shiny, red luster dust.
I found a plate that was about the same size as the bow that I needed, and covered it with waxed paper.
I made a royal icing and colored it the same color as the bow. I started by putting a big glob in the center of the plate.
I placed 7 loops on the bottom layer. I know the picture only shows 6, but I added one later.
After the first layer dried a little bit, I put another big glob of royal icing in the center.
And proceeded to add more loops...
....and still more loops.
I added more and more layers of icing and loops until the bow was complete. It was very fragile, and I wish I had another day or two to work on it. Next time I will start the bow a week in advance, which will give it a little more time to harden. But I was very pleased with the end result.


A big THANK YOU to Krissy for letting me be a part of your wedding!


Monday, November 23, 2009

Black Friday Deals!!!!

I always love to go out shopping on Black Friday. Last year I took my daughter with me, and we had a great time. Our adventure started about 3:30 a.m. and ended about 9:00 a.m. I'm not sure if I like it because of the deals, but I know that I like the thrill of being in a crowd. And I really like to people watch. People get so crazy when they are trying to get a good deal on things. It's like their inner demons come out as they rush into the store and wrestle with others to get that one COOL gift.

My husband thinks that I am crazy for even wanting to go out so early. He would much rather stay in bed and shop online without the crowds. Now, I know that a lot of you are like my husband, and would rather stay in bed. So that is why I am doing this post. Amazon has already started their Black Friday Deals. They started today!

Amazon searched for the best Black Friday deals everywhere--including deals other stores are planning--so they can meet or beat their prices and bring them to you even earlier. These limited-supply offers will go quickly but they will add new ones throughout the day, every day this week, so you can skip the long lines and still save a bundle.

Wednesday, November 11, 2009

My Bread Cornucopia

A couple of years ago I had the opportunity of hosting Thanksgiving Dinner at my house. I was thrilled at the chance I had to decorate and get ready for such an event. I decided to make a Cornucopia out of bread to hold my home-made rolls. It was a little tricky to make, but in the end it turned out really cute and was well worth the effort. If any of you are feeling adventurous this year, I will post the instructions so that you can give it a try. I wish I would have taken step by step pictures as I made this, but unfortunately I wasn't a blogger back then. Hopefully you can do it with just the instructions. You can also email me if you have any questions.

Bread Cornucopia


Ingredients and materials:

Colander
Aluminum foil
Vegetable oil
2 loaves of frozen bread dough (I used my own bread dough)
Egg wash (used as paste)
Cooking brush


Wrap a colander with aluminum foil and spray with vegetable oil.

Let the frozen dough thaw (but not rise), then roll one over the colander. Use egg wash as a paste to attach the bread around the colander. Once it's attached, egg-wash the entire surface.

Cut the other loaf of bread dough into strips. Lay the strips of dough from the top to the bottom and tuck inside the colander. Lace the cornucopia with the dough strips, basketweave style.
Egg-wash the complete surface again and twist the bottom together. Bake at 400 degrees for 15 to 20 minutes, or until golden brown.

**This portion is just for show, not to be eaten.

Friday, November 6, 2009

In Loving Memory of Kevin's Youth.....My First Tombstone Cake

A dear friend of ours turned 40 today. His wife surprised him with a HUGE party. It was a funeral for his youth. I was so lucky to be able to make the cake. (Be sure to click on the picture to get a better look at the details.)

This cake was a lot bigger than it looks in the picture. It took more than 5 dozen eggs and a half a gallon of oil. The top portion of the tombstone was made using rice crispy treats (5 recipes). My husband, Jim, helped out a lot with this cake. He started by drafting it out on the computer for me, and he even marbled the fondant. Isn't he good?

Here is the back of the cake.

Almost everyone came to the party dressed in black.
Here is the birthday boy, Kevin... aka Bishop McEvoy. HAPPY BIRTHDAY!
It was such a fun party. I am glad that I got to be a part of it.

Monday, November 2, 2009

Pumpkin Sheet Cake With Cream Cheese Frosting


We got to go to many parties this weekend for Halloween and Birthdays. We ended up taking a Pumpkin Sheet Cake to two of the parties. I really enjoy pumpkin cake, pumpkin cookies, and really anything that is made of pumpkin. But this pumpkin sheet cake is the MOST DELICIOUS pumpkin cake that I have ever eaten. It is super moist. For this reason I am going to share the recipe with you. I think EVERYONE needs to try it.

Like the Candy Corn Sugar Cookies that I made, this recipe also comes from Tina at Mommy's Kitchen. I really love her site, because she has a monthly menu and she posts recipes for all of her meals. They are easy, practical meals that anybody can make. And of course, she also has delicious desserts and treats. Stepping into her blog is like stepping into her kitchen. So thank you Tina, for having such an AMAZING site.

Pumpkin Sheet Cake With Cream Cheese Frosting

15 oz. can pumpkin (I used Banana Squash that I had baked)
2 cups sugar
1 cup vegetable oil
4 eggs, beaten
2 cups flour
2 tsp. baking soda
2 tsp. cinnamon
1/4 tsp. nutmeg
1/2 tsp. salt

In a mixing bowl, beat the pumpkin, sugar, and oil. Add eggs and mix well. Combine the dry ingredients and add to the pumpkin mixture, beating until well blended. Pour into a greased 10X15 inch baking pan.


Bake for 25-35 minutes at 350 degrees.

Cool the cake completely and then frost it with the cream cheese frosting. Here's what you'll need for the frosting:

Cream Cheese Frosting:

1 stick butter, softened (1/2 cup)
8 oz. cream cheese, softened
1 1/2 tsp. vanilla
2 1/4 cups powdered sugar
5-6 tsp. milk

Beat the butter and cream cheese together. Add the vanilla and blend till smooth. Gradually add the powdered sugar and mix well. Add the milk a bit at a time until you get it to a spreadable consistency. Spread on top of the sheet cake.

You can also top this cake with some chopped pecans or walnuts, but that is optional.

I hope you give this cake a try and enjoy it as much as we did. DELICIOUS!