Tuesday, December 14, 2010

By Request.....

Chocolate Candy Cane Cupcakes!


I have received many emails and messages asking for the recipe to these delightful treats.  I made them using a chocolate cake mix,  but what makes them extra special is the candy cane filling and the Chocolate Peppermint frosting.  So, I hope you give them a try.  They really are DELICIOUS!


Candy Cane Filling

8 ounces Cream Cheese (at room temperature)
1/2 Cup Confectioner's Sugar
1/4 Cup Heavy Cream
4 ounces White Chocolate (Melted)
Crushed Candy Canes

In a medium sized mixing bowl, beat cream cheese until smooth.  Add confectioner's sugar and blend well.  Add cream and white chocolate.  Beat until fluffy.  With a spatula, fold in 3-4 Tablespoons of crushed peppermint.

I used the Wilton Tip #230 to fill the cupcakes with.  Be sure to crush the candy canes pretty fine so that they will go through the tip easily.


Chocolate Peppermint Frosting 

1 Stick Butter
6 Tablespoons Milk
4 Tablespoons Cocoa
3 Cups Powdered Sugar (approximate)
1 teaspoon Vanilla
2 small drops of Peppermint Oil ( be careful, a little bit goes a long way)

Bring to boil margarine, milk, and cocoa.  Remove from heat.  Add powdered sugar, vanilla, and Peppermint Oil.  Beat well.


I topped my frosting with crushed candy canes and a candy cane Hershey's Kiss.


Monday, December 13, 2010

You Take The Cake!


Last Night I had a Primary Board Meeting.  I really wanted to thank all of the teachers for their many hours of selfless service.  So the theme of the meeting was "You Take The Cake".  Pictured below is the invitation to the meeting.


For refreshments, we had cupcakes.  My good friend Karrie made some delicious Pumpkin Spice Cupcakes and also some White Cupcakes with a Raspberry Filling.

I made Chocolate Cupcakes with a Cream Cheese Candy Cane Filling.


And I also made Coconut Lime Cupcakes.


I practiced making the coconut lime cupcakes until I got them just right.  
In fact, I think they were PERFECT!  
This is what I did....

COCONUT LIME CUPCAKES
1 Duncan Hines Yellow Cake Mix
3 Large Eggs
1/3 Cup Vegetable Oil
1 Cup Coconut Milk
1/3 Cup Lime Juice
1 Tablespoon Lime Zest
1 Cup Shredded Coconut

Mix all ingredients together in a large bowl at low speed until moistened (about 30 seconds).
Then beat at medium speed for 2 minutes.  Fill cupcake liners about 2/3 full.  Bake at 350 degrees for 18-21 minutes, or until toothpick comes out clean.

LIME BUTTER CREAM FROSTING
1/2 Cup Butter
1/2 Cup Shortening
3 Cups Confectioner's Sugar
1 teaspoon Lime Juice
1 teaspoon vanilla
1 teaspoon Lime Zest
Flaked Coconut for decorating

Beat the butter and shortening until smooth, then add sugar and beat.  Add lime juice, vanilla, and lime zest and beat until fluffy.  Spread the frosting on cooled cupcakes and top with shredded coconut (I toasted mine).


The board meeting went well, the cupcakes were even better.  I hope you give these delicious treats a try!

Friday, November 19, 2010

Today I Am Thankful For......

Many Things!
But here are a few of the most important:

1.   My Savior, Jesus Christ.
2.   A LOVING husband who supports me in all that I do.
3.   The BEST children any Mom could ever ask for.
4.   Parents and In-laws who are GREAT examples to me.
5.   Six WONDERFUL siblings who I adore and look up to.
6.   AMAZING friends and neighbors.
7.   My little home.  It is CUTE and perfect for us.
8.   GOOD health.
9.   A baby who sleeps through the night.
10. The many opportunities that I have to serve others.

And the list goes on and on.

When I was growing up, my Dad often made my favorite dessert....Brownie Pudding Cake (which I will post a recipe for later).  But, the other day I was looking through one of my cookbooks, and I found a recipe for an Apple Pudding Cake.  You can't go wrong with pudding cake, right?  If Brownie Pudding Cake is good, then Apple Pudding Cake must be equally as good.  Well, we have an abundance of apples right now, so I decided to give this recipe a try.  It was simple to make, and my house smelled AMAZING while it was baking.  I kept telling the kids that I hoped it tasted as good as it smelled, and it did.  It was so delicious!  The cake was super moist, and the hot apples on top just made it WONDERFUL!  You are going to have to give this recipe a try.


APPLE PUDDING CAKE
This recipe may need to be doubled if you are using a 9 by 13 -inch pan.

Cake:                                                                            
1/4 cup shortening or oil                                               
1 egg                                                                               
1/2 cup milk or apple juice                                                         
1 cup white sugar                                                           
1 teaspoon vanilla                                                          
1 cup sifted flour
1 teaspoon baking powder
1/4 teaspoon salt

Filling:
1 bottle sliced apples (I just boiled fresh apples)
2 Tablespoons tapioca or cornstarch
              (or apple pie filling)
sugar
cinnamon

In a bowl, cream together sugar, shortening, egg, milk or juice from apples, and vanilla.  Mix together dry ingredients and add to mixture.  Set aside.

In a saucepan, drain remaining juice from apples.  Mix a small amount of liquid into cornstarch or tapioca.  Mix tapioca according to package directions.  Cook and stir over medium heat until mixture thickens.  Add apples into thickened sauce and heat.  Pour apples or apple filling into a baking dish.

Drop cake batter by tablespoon on top of apples.  (The best way to do this is to have two tablespoons - 1 to scoop batter and another to scrape the batter off the spoon.)  Spread the dollops of batter carefully so all the apples are covered with cake batter.  Sprinkle with sugar and cinnamon.  Bake at 350 degrees for 30 minutes or until cake tests done.  (I doubled the recipe and it took closer to 45 minutes to bake)  Serve warm with ice cream or whipping cream on top.


Friday, November 12, 2010

Turkeys....Turkeys....Turkeys....

Chocolate Chip Cookie Turkeys


First, Start with your favorite chocolate chip cookies.
(I suppose sugar cookies would also work)


 Take a cookie, and frost it with chocolate frosting.
(I used frosting from a can so this would be quick and easy)


Stick 8-10 sliced almonds in the frosting at the top.


Place two white chocolate chips on for eyes.


Place a mini chocolate chip in the center of each white chocolate chip.
(It helps to dip it in frosting first)


Place a candy corn front and center for the beak.


Break the center from a twisted pretzel for the feet.


So easy a child, caveman, or turkey could do it!

Wednesday, October 27, 2010

This Week's FHE Treat......Blondies!

Our family looks forward to Family Home Evening every Monday night.  The kids really enjoy doing activities together as a family, but most of all, they like the treats that come with it.  This week we decided to make Blondies loaded with butterscotch and chocolate chips.  They look good, don't they?  They taste even better than they look.  Rich, yummy, goodness.


This is what you need to make these treats.

1 cup of butter (2 sticks), melted
2 cups of light brown sugar, firmly packed
2 teaspoons of baking powder
1/4 teaspoon of salt
1 teaspoon of vanilla
2 cups of all-purpose flour
2 eggs
1 cup of semi-sweet chocolate chips
1 cup of butterscotch chips
1 cup of chopped pecans, finely chopped (optional)

Preheat oven to 350 degrees. Butter a 9 X 13 baking dish (I used cooking spray with flour in it).  Combine baking powder, flour, and salt.  Set aside.  Cream together butter and sugar.  Mix in eggs and vanilla.  Add the flour mixture and mix well.  Stir in the baking chips and nuts.  Pour mixture into your greased baking dish.  Bake for 35 to 40 minutes (the center will still be kind of gooey).  Allow to cool completely before cutting. Preferably overnight.


Blondies are so delicious with a little ice cream on top....


...and even better topped with a home made caramel sauce!


This is Ina Garten's Caramel Sauce.  

1 1/2 cups sugar
1/3 cup water
1 1/4 cups heavy cream
1/2 teaspoon pure vanilla extract

Mix the water and sugar in a medium heavy-bottomed saucepan.  Cook over low heat for 5-10 minutes, until the sugar dissolves.  Do not stir.  Increase the heat to medium and boil uncovered until the sugar turns a warm chestnut brown (about 350 degrees F on a candy thermometer), about 5 to 7 minutes, gently swirling the pan to stir the mixture.  Be careful- the mixture is extremely hot!  Watch the mixture very carefully at the end, as it will go from caramel to burnt very quickly.  Turn off the heat.  Stand back to avoid splattering and slowly add the cream and vanilla.  Don't worry- the cream will bubble violently and the caramel will solidify.

Simmer over low heat, stirring constantly, until the caramel dissolves and the sauce is smooth, about 2 minutes.  Allow to cool to room temperature, at least 4 hours.  It will thicken as it sits.

ENJOY!


Thursday, October 14, 2010

Bakerella's Book Signing and a Giveaway!

I have the best husband in the world.  He didn't want me standing in line all day at a book signing because I just had the baby.  So, he went to Salt Lake early this morning to get me a ticket to meet Bakerella.  He even had to do some sweet talking to get me a ticket.  I was so very grateful.  I got number 10!

Here she is.......Bakerella!  She is cute and sassy, just as I had envisioned from reading her blog.

I have always been a fan of Bakerella, and I love to make her cake pops.  She just put together a Cake Pop book, with amazing illustrations and step by step instructions to make the delicious treats.  I was so excited to see that Salt Lake was on her list of stops on her book signing tour.

Williams Sonoma had cute displays of her books all over the store.

We ended up getting to Trolley Square just in time for Bakerella to arrive.  There were SO, SO, SO many people there!  And once again, I was happy to have a ticket that said number 10 on it.  They took people back in groups of 10, so I was able to get in quickly.  Bakerella was a lot of fun!  She was so nice to let us get our picture taken with her.  My daughter passed up an opportunity to go to the park with the other kids, just so she could meet Bakerella.  I was so glad to have her with me.

My daughter was a little shy when it came to meeting Bakerella.

When we left, there were still hundreds of people in line waiting their turn.  We had so much fun!

Now for the giveaway.  I have a signed copy of this wonderful book, that I will give to one lucky reader of my blog.  There are 4 ways to enter (you can do all 4 if you would like).....  Please be sure to leave a separate comment for each.

-First, leave a comment on this post telling me what your favorite fall treat is.  
-Second, put a link to this post on your Facebook page, and leave a comment telling me that you linked on Facebook.
-Third, become a fan of Crazy About Cakes on Facebook.  Leave a comment telling me that you've become a fan.
-Fourth, become a follower of my blog.  Leave a comment telling me that you follow Crazy About Cakes.

I will be choosing a winner on Tuesday, October 19th using Random.org.  Good Luck!

WE HAVE A WINNER!!!!!
Congratulations to Carrie...comment #24!  I will be contacting you!


Blogger Carrie said...

My favorite fall treat is pumpkin chocolate chip cookies. (Although, I tend to make them year round because they are so yummy.)

Thanks to everyone who entered. 

Monday, October 11, 2010

Mini Orange Cupcakes..... A Fun Fall Treat

I'm excited to be back in commission after having my baby.  I now have a baby boy that is 10 days old, and he is cuter than ever.  I really lucked out with him.  He is a very good baby, which makes having 5 kids easier for me to adjust to.  The older kids adore him and always beg to hold him, which gives me time to get things done.  Sometimes I wish I could just have him all to myself, but I take all the snuggles I can get.

Anyway, I've been aching to get back into the kitchen.  I always love Fall and Halloween time.  There are so many fun treats and goodies to make that fill my home with wonderful aromas.  I found a recipe for these Orange Cupcakes on a blog that I follow.  Laura over at http://realmomkitchen.com/ always has fun recipes to try.  I couldn't resist these cupcakes.  I changed them up a little and made them mini.  I also added a candy corn on top to add a little pizazz.


Fresh Orange Cupcakes
  • 1 package of yellow cake mix
  • 1/4 cup of sugar
  • 1 tablespoon of orange zest
  • 1 cup of orange juice
  • 1/2 cup of canola oil
  • 1 teaspoon of vanilla extract
  • 4 large eggs
1. In a large bowl, combine the cake mix, sugar, and orange zest. Whisk to combine. Add orange juice, canola oil, vanilla extract and eggs. Blend with the mixer on low speed for one minute, then speed it up to medium and beat for 2 more minutes.
2. Fill cupcake papers about 1/2 to 2/3 full. Bake at 350F until golden in color and a toothpick test comes out clean, about 22-25 minutes.
3. Cool in the pan for 10 minutes then transfer to a cooling rack to cool completely.
Orange Butter Cream Frosting
  • 1 cup (2 sticks) butter, very soft
  • 6-8 cups powdered sugar
  • 1/2 cup orange juice
  • 1 teaspoon grated orange zest
  1. Place the butter in a large mixing bowl. Add 4 cups of sugar, then the juice and the zest. Beat until smooth and creamy. (I also added orange food coloring)
  2. Gradually add the remaining sugar, 1 cup at a time, until icing is thick enough to be of good spreading consistency. Use and store at room temperature. (Don’t refrigerate and it will last in a covered container for about three days.)


I think I will make some brownie bites also, and top them with this orange butter cream frosting.  You can't go wrong with chocolate and orange!  I'll save that for another day.

Thursday, September 16, 2010

My New Love......Paula Deen's Ooey Gooey Butter Cake


While I was shopping at Walmart one day, I came across the yummiest lemon cake in the bakery.  After trying this delicacy, I decided that I should find a recipe for it.  After all, I couldn't keep spending $3.00 for a little slice of cake.  The package said that it was Paula Deen's Ooey Gooey Lemon Butter Cake.  Surely I could find a Paula Deen recipe online.

And I did!  I really love Google.  With the click of my mouse, I was able to find a ton of sites with this recipe.  And what's even better........The recipe comes with many variations.  I plan on trying the pumpkin variation next. It sounds perfect for fall.  Today I made the Lemon Butter Cake, because that is what I was craving.

Paula Deen's Ooey Gooey Butter Cake
Cake
1 (18.25 ounce) box yellow cake mix
1 egg
1/2 cup (1 stick) butter, melted

Filling
1 (8 ounce) package cream cheese, softened
2 eggs
1 teaspoon pure vanilla extract
1 (16 ounce) box confectioners' sugar
1/2 cup (1 stick) butter, melted

Preheat oven to 350 degrees.  Lightly grease a 13x9x2 inch baking pan.

In the bowl of an electric mixer, combine cake mix, egg, and butter and mix well.  Pat into the bottom of   prepared pan and set aside.

Still using an electric mixer, beat cream cheese until smooth; add eggs and vanilla.  Dump in confectioners' sugar and beat well.  Reduce speed of mixer and slowly pour in butter.  Mix well.

Pour filling onto cake mixture and spread evenly.  Bake for 40 - 50 minutes.  Don't be afraid to make a judgment call on the cooking time, because oven temperatures can vary.  You want the center to be a little gooey, so don't bake it past that point!

Remove from oven and allow to cool completely.  Cut into squares.  Just remember that these wonderful little cakes are very, very rich, and a little will go a long way.

Here are the different variations.....you can have fun and even create your very own version of this delicious dessert.


Pumpkin Gooey: Follow the original recipe, adding a 15-ounce can of pumpkin pie filling and an extra egg to the cream cheese filling. Bake as usual, remove from oven, and allow to cool. Cut into squares and top each square with a pecan half. Serve with a dollop of fresh whipped cream. I promise you'll never want pumpkin pie again!

Pineapple Gooey: Add a 20-ounce can of drained crushed pineapple and an extra egg to the cream cheese filling. Proceed as directed above.

Lemon Gooey: Use a lemon cake mix in place of the yellow cake. Add the juice (approximately 1/4 cup) and zest of 2 lemons to the cream cheese filling. Proceed: as directed above.

Carrot Cake Gooey: Use a spice cake mix, and add 1 cup chopped nuts and 1 1/2 cup finely grated carrots to the cream cheese filling. Proceed as directed above.

Peanut Butter Gooey: Use a chocolate cake mix. Add 1 cup creamy peanut butter and an extra egg to cream cheese filling. You can sprinkle the top of batter with 1 cup chopped peanuts if you like. Proceed as directed above.

Chocolate Chip Gooey: Use either yellow or chocolate cake mix. Sprinkle 1 cup chocolate chips and 1 cup chopped nuts on top of filling. Proceed as directed above.

Banana Gooey: Use a yellow cake mix. Prepare cream cheese filling as directed, beating in 2 ripe bananas and an extra egg. Proceed as directed above.

Nutty Gooey: Use a yellow cake mix, and add 1 cup chopped nuts to the cake mixture. Proceed as directed above.

Chippy Gooey: Stir 1 cup white chocolate chips, peanut butter chocolate chips, butterscotch morsels, Heath Almond Toffee Bits or Heath Milk Chocolate Toffee Bits into filling. Proceed as directed above.


Give this treat a try, and let me know what you think.  Also let me know if you have any other variations that I can add to my list!  These bar-like treats will not disappoint.

Monday, August 9, 2010

Darin and Kari's Wedding Cake

I vowed that I would never make any cakes 9 months pregnant.  But when my brother asked me to make his wedding cake, I was happy to do it.  Luckily, I have a loving husband who helps me when I need it.  He actually did most of the work on this cake, and it turned out great!

Two of the cakes are chocolate with a chocolate butter cream filling, and the other two are a white cake with butter cream filling.  As we were getting ready to stack the cake, my 3-year old came up to my husband with cake crumbs all over his face!  We soon realized that he had taken several handfuls of this cake and eaten them.  We were able to doctor it up and save the day.  It turned out great, and I am very thankful for my husband, Jim, for helping out so much with this cake.  And a BIG congratulations to Darin and Kari on their special day.  Thanks for letting us do your cake!  I think I will now retire from cakes until this baby is born.
This is Darin and Kari cutting their cake.  It wasn't long before they had it smashed in each other's faces.  They were sure silly!

Sunday, July 4, 2010

Chocolate Chip Cheese Bars.....A Guest Post From Jill.

My dear Sister-in-Law posted this recipe, and I thought that all of you would enjoy it.  These Chocolate Chip Cheese Bars are to die for!  Here is a copy of her post.......


First of all, I don't usually post recipes because I am the worst at following them.  I get it from my mom- she calls it the "Football Rules of cooking- unlimited substitutions."  My mom probably gets it from her mom.  I have recipes from my grandma that actually call for a glug of milk, or a glug of oil.  I look at recipes more as suggestions or guidelines, then do my own thing.  Sometimes things turn out really good, and sometimes... not so good.  My husband likes the way I cook, so I guess that's good enough.  I discovered allrecipes.com and found that there are a lot of cooks out there like me.  It makes me laugh when I read the comments, and someone says they didn't like the recipe that much, and that they substituted rice vinegar for apple cider vinegar and left out the ginger or doubled all the spices...  BTW, I do follow baking and canning recipes.


Anyway, my sister-in-law made these yummy bars earlier this year, and passed the recipe along. 


Chocolate Chip Cheese Bars


2 cups of your favorite chocolate chip cookie recipe (or 1 tube refrigerated chocolate chip cookie dough)
1 package (8 oz.) cream cheese, softened
1/2 cup sugar
1 egg


Divide cookie dough in half.  For crust, press half of the dough onto the bottom of a greased 8 X 8 inch baking pan.
In a large bowl, beat the cream cheese, sugar and egg until smooth.  Spread over crust.
Crumble remaining dough over top.
Bake at 350 for 35-40 minutes, or until a toothpick inserted near the center comes out clean.  Cool on a wire rack.  Refrigerate leftovers.
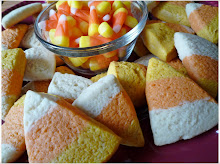

I doubled the recipe, and cooked it in a 9 X 13 pan.  


Here's the recipe I like for Chocolate Chip Cookies:

1 c white sugar
1 c brown sugar
1 c butter flavored shortening (or 1/2 c shortening and 1/2 c butter)
3 eggs
1 t vanilla
1 t salt
1 t soda
3 cups flour
1 bag chocolate chips

Cream together sugars, and shortening.  Add eggs and vanilla and mix well.  Add dry ingredients then chocolate chips.  Bake at 375 for 8 minutes.


Thank you so much Jill for this yummy post!